VISTA VAN HISTORY
A book written by Gord McWilliams~
In the Beginning
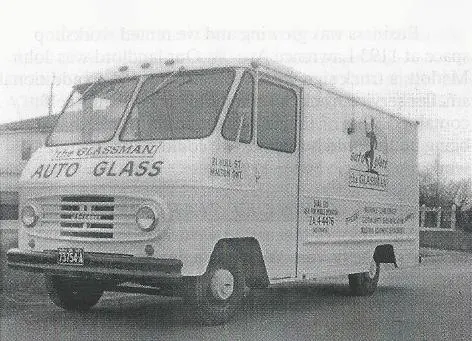
In the summer of 1951 I started working for an auto glass installation firm in downtown Toronto called Safety Auto Glass. It was owned by a fellow named Al (Choo Choo) Train. He had 3 brothers that were also in the auto glass business in Toronto. After working for 2 summers, I, at the age of 16 quit school to work full time. Two years later my boss was looking to expand his business and add a second installation truck. This meant that I would get an apprentice to work with me. The company did not have a workshop large enough to get a vehicle in, so all repairs were done on the street.
While I was installing a glass in a car, a young fellow about my age came walking down the street, stopped to watch and asked if there was any work available. I told him to go in and talk to Al. A short time later he came out and said “see you tomorrow”.
The next day I met Manfred Block. Manfred was a recent arrival from Germany. As we worked together and got to know each other I learned that “Fred” worked for a large industrial company Krupp in Germany. Fred was quick to learn and we got on well. Fred encouraged me to learn a bit of German, but that was not of much interest to me. I did learn that black in German was Schwarze. I was soon calling Fred by the nickname “Schwartz”.
By 1957 we were both married and looking to expand our horizons. Jack Singer, one of the wholesale glass salesmen that called on Al represented the Montreal firm Faucher & Fils. At the time, Jack was looking for a company to open a warehouse in the Toronto area. Although Jack would never allow himself to approach Fred or myself directly, he did let it slip that there were other auto glass opportunities in the want ads.
Checking the papers one night I saw an ad from a company out in the suburb of Weston Ontario looking for an experienced person to run a new auto glass company that would be an addition to the existing radiator repair company A1 Radiator.
I applied, convinced the owner Peter Corbin that 2 people were needed to install some of the larger windshields that were being used in the new cars of the day. Fred and I were hired and before long we were operating a glass shop, part of A1 Radiator and Glass and the first independent auto glass distribution warehouse in Ontario, part of Jack’s company. We worked long hours for the new company, were well treated and business grew. By 1961, Fred and I were again getting restless and talked about starting our own business.
Ahead of Our Time
Early in 1962 we decided to make the move. We pooled our money and bought a Curbside van which was a large box style delivery van.
In order to keep start up costs down, we outfitted the truck as a fully self contained workshop complete with a mobile phone. The phone was in fact an offshot of the Marine ship to shore phones. To call in or out you needed to contact the mobile operator for a connection. Not only did this prove to be very workable for a business that did not have a real property location, but our new customers found it a great novelty to be able to call us on the road and were always amazed that they could talk to us while we were driving.
If we were working outside of our mobile workshop the phone had a feature that allowed us to turn on a switch and instead of the phone ringing it would sound the horn on the truck. Some of our customers thought it great fun to call while we were working at their shop and hear the horn blow and one of us run to answer. A downside to this feature was that it was easy to forget to switch back to regular ring and we could be stopped in traffic and all of a sudden the horn would start sounding. Some bad looks from the driver ahead!
Business was growing and we rented workshop space at 1193 Lawrence Ave. W. Our landlord was John Madott, a truck sign writer. We also needed an additional smaller service truck but loved the idea of being self contained. One of the new city delivery trucks that were being built would be ideal if we could stand up in it to work.
Let’s Get Started
After a lot of discussion we decided to purchase a new 1964 Chevy Van. We made a deal with one of our customers Belmont Chev and drove home the new truck.
Fred had great welding and fabricating skills that he learned when he worked for Krupp in Germany. It was not unusual for Fred to help out a troubled body man at one of our customers shops align a windshield opening in a smashed vehicle. This was also a reason for our customer loyalty.
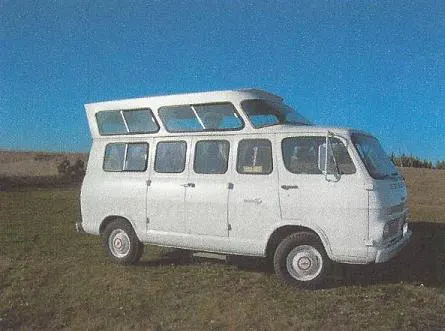
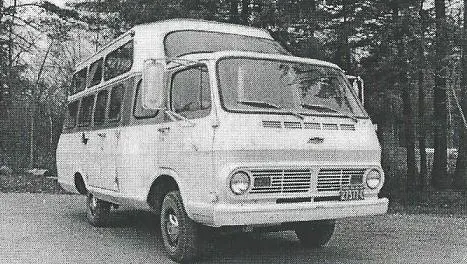
If we were going to be able to stand up in the new truck, we needed to raise the roof. Since we were in the glass business we decided that the new roofline should have a lot of glass.
The new upper windshield proved to be a bit of a challenge. In order to fit, the new glass had to come from an existing car and have a tip to tip measurement that was the same as the width between the drip rails on the new truck. We checked and tried a lot of different glasses before finding the back window from the 1962 Chevrolet – Pontiac 4 door sedan. For the record, the upper windshield glass part number is DB3100GN. It was almost a perfect fit and as a bonus it was a wrap around design.
Fred determined that we needed to make a mould of the glass so that he could build a strong steel framework that could be used to fabricate and shape the actual light steel tube framing we would use for the construction of the new roof. The mould would have to be strong enough to survive heating the steel tubing red hot, bending, hammering, twisting and clamping it to the mould. Fred decided to use 1/4 inch steel plate that would be heated red hot and hammered blacksmith style into the compound shape of the glass that we were going to use.
Duhhh!
Our shop could only accommodate 1 vehicle so, with the new truck in the shop, the work to build a camper would have to be completed quickly.
On a Friday we decided that the best way to proceed was to use a windshield shipping crate which was a light weight wood strip wire bound box designed to hold about 10 windshields. The crate was about 6 ft long x 3 ft high x 3 ft wide. Since it had open slat sides we lined it with plywood and called a ready mix cement truck to deliver a couple of yards of cement.
When the truck arrived it was obvious that the crate would have to be placed close to the inside of the overhead door in order to get the cement into the crate. The cement was poured into the crate and it looked like the crate would break apart. It bulged along the sides but thankfully held together.
It was about 3/4 full of wet cement and we set the glass into the cement to make the mould. The glass was put into the cement with the main ‘outside’ curve of the glass down and the wrap around wing portions sticking up.
This positioning would give us the right shape to make the master mould. The first problem was that the wet cement would not hold the shape of the high wrap around curve of the corners of the glass. As we dug our hands into the cement to scoop it up along the high ends the caustic materials in the cement and the rough stone soon had our hands chemically burnt and physically shredded.
DUHHH. Never thought about that!
The cement was starting to firm up but still would not hold its shape. The high corners were also looking weak for the coming pounding they would have to take. Time to reinforce the corners! We started to grab all manner of steel pieces that were lying around the shop. Pieces of steel rod, U channel, pipe or whatever came to hand were imbedded into the cement. As the cement set, this additional metal helped to hold things in place. By the end of the day we had a cement mould shaped like our windshield glass. The cement needed to cure overnight so we went home with bleeding, stinging, burnt hands and a lot of work ahead of us for the weekend.
Saturday morning found us back at the shop ready to start the next step. The glass had to be removed from the cement. Chipping around the edges to get rid of all the small amounts of dried cement took awhile and of course the glass was so scratched that it was no longer usable. No matter, the mould was there! The ‘blacksmith’ work was really all of Fred’s work as he was the expert metal worker. I mostly stood around as a helper and supplied the coffee and donuts. By Sunday night the manst mould was made. We went home feeling really tired but satisfied.
Monday morning and ready for another week of work. DUHH. Can’t get any customers cars into the shop with this great big block of cement in the doorway!
OK, let’s get the hammer and knock it apart. The first couple of hits with the hammer had about the same affect as firing a 22 pistol at a stone cliff face. Just a couple little puffs of dust. OK, we need a bigger hammer. We ended up with the biggest sledge hammer the hardware store carried. It was heavy to swing and when it hit the cement little bits of shrapnel and some dust flew off.
All of this was happening in our glass shop – not the best place for flying concrete. Stop work and get covers over all of the glass. Windshields were stored on vertical peg racks on the walls so these all had to be hung with covers. A good portion of our work was done on a mobile basis so leave the concrete and let’s get out and service our customers.
By the second day of bashing at the concrete block during our spare time it was obvious that we were not making any headway. In the end we hired a young fellow full time to stand and bash away at the block. The upraised corners were especially challenging because we had stuffed them with all the reinforcing steel and now when the hammer hit it mostly contracted the steel and not the cement. Bring in the chisel and keep chipping away.
When Nick finished a day of chipping and bashing our shop looked like a grenade had gone off in a gravel pit. Sweep up and start to work on our new service truck.
It was a bit unnerving to take a brand new truck and with a hammer and chisel cut most of the roof off! After a few of weeks of ‘night shift’ work building up the new roof and Nick whittling down the cement monolith thing were starting to look better.
We had left the front portion of the original roof over the front seats in place and started the raised portion just behind the back of the seats. This did two things for us. It left the front part of the truck structurally stable and created a pleasing new roofline.
We discovered that because of the design of the upper windshield that we chose, the top tip to tip measured about 4 inches narrower than at the bottom. This meant that the sides of the upper roof area actually sloped in from bottom to top by about 2 inches on each side. A gigantic benefit of this was that by creating a sharp bend 2 inches in along the entire length of the outer edge of the roof that we had chiseled off we had a strong readymade ‘original’ ribbed roof for our truck.
Setting the roof metal in place for our first trial fit we made another discovery. Since the upper windshield naturally sat sloping back the top edge of the glass was about 8 inches further back than the bottom edge. This in turn meant that the new roof position was also about 8 inches further back than its original position. We then had the choice to cut off a strip across the back of the roof metal or let it hang out over the back of the body. To leave the roof overhanging the back body line meant that we needed a reverse slope from the top of the new roofline back down to the original truck. This was a roof style that had just recently come out on some of the new cars of the day.
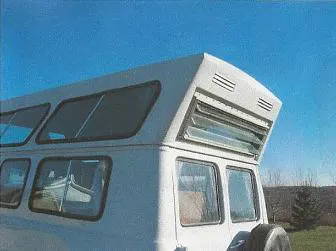
In the end it was less work to fit the new roof on and gave us better head/shoulder room inside the truck, allowing us to install a protected opening window across the back that could provide ventilation and be left open in all but the most severe storms.
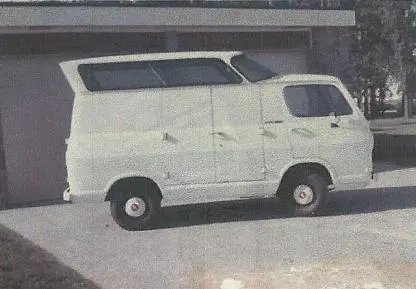
The whole new upper roof skeleton was fabricated on a jig that Fred built. 1″ x 1″ steel tubing was used for the skeleton. There was only a small amount of sheet metal required to fill in between the side windows (which also followed the sloped design of the roof) and around the front and back corners. A small bit of the original remaining portion of the front roof was wrapped up over the new upper roofline tying the lower roof to the upper roof. Once the new roof was secured in place some body work was needed to clean everything up and of course paint the new top. We had our good customer Royal Auto Body on St. Clair Ave. W. do the final work for us. Driving back with our new service truck we were aware of a lot of heads turning to see what was driving by. It seemed like we had a billboard on wheels for our business.
Fred Ready to Go On the Road
What ended up being a good looking design was really taking advantage of what we had to work with and a lot of good luck! The workshop interior was quickly built and our new service truck was on the road.
That Would Make a Good….

Everywhere we went people came over to look at our new model truck. Besides getting lots of comments about how great it looked we also got a lot of people saying what a great camper it would make.
After hearing these comments for a few months we started to seriously think about actually making a camper truck. Playing around with various ideas it did seem workable. The decision was finally made that we would try and build a camper. The first problem of course was that we needed another truck to chop up. The new undertaking meant that in addition to working at the auto glass all day we would have to work nights and weekends to make the camper. Our auto glass business was keeping us busy and paying our wages but we definitely did not have surplus cash for another vehicle.
How Can We Sell It?
We went to our favorite car dealer – Belmont Chev – to ask if they would put our camper in their showroom. “Not without approval from GM Head Office”. Bernie Zardo, truck sales manager for Belmont Chev, contacted GM Head Office in Oshawa and arranged an appointment with the truck sales manager for Canada to show our new truck.
When Fred and I arrived at the GM Head Office, we parked right in front of the main entrance. We went in to talk to the sales manager, but before we could get to his office, many of the people in the building were out front looking at our vehicle. It was very well received and the meeting went very well.
We were assured of GM sales support to sell a camper version of their van and were encouraged “to spend as much of our own money as we wanted” to help sell more GM trucks! Not the exact result we were looking for but nonetheless a step in the right direction.
Let’s Talk to the Bank
We had our business and personal banking with a branch of the Royal Bank that was located just two buildings away from our shop. We went to see the manager, a Mr. Reynolds, to explain what we wanted to do. He threw up his hands in horror and declared that he could never lend us the money as he would never go camping and would not have use of such a thing. I remember being quite shocked by his response and saying “It’s a good thing we aren’t trying to make brassieres as you don’t use those either”.
We talked over the banks response with Ben our accountant and he suggested that he could put us in touch with a TD bank manager he knew at the Spadina and Queen St. branch. After switching all of our banking and signing our lives away we had the money.
Then it was back to Belmont Chev for another truck to hack apart.
Designed From Scratch
My older brother Bob was always making models when I was young so I had some idea about model making. I started making small models of the furniture that we thought we would need to make a camper.
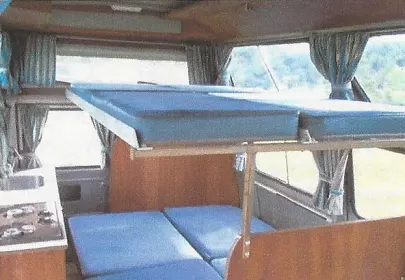
The truck really did not have a lot of space so as much as possible we tried to make items have a duel purpose. This approach only worked out with the dinette seating and bed. Other camping trailers used the idea of dropping the table down and creating a bed. We also used that idea, but it created a narrow bed. Using some drinking straws and pencils I worked out a way to make the bed 54 inches wide and to have a top bunk bed as wide as the bottom one. This configuration could sleep 4 adults.
Once Fred sourced tubing that would slide snuggly inside of each other it was relatively easy to make the bed supports. The long aluminum angle supports that held the upper cushions in place were then stored in a small cupboard up at the ceiling. All of the cushions had solid plywood backs so that they could span the spaces between the supports. There were 3 aluminum angle supports for the upper bunk. Each outside support was a simple 2″ x 2″ angle. The center support was made of 2 angle pieces riveted together. This gave perfect support for the four upper bed cushions that were stored under the dinette seats. Everything went together simply and easily.
We later discovered that when sleeping on the upper bunk and tossing and turning it was possible for the aluminum supports to spread apart enough to let the cushions and sleeper drop through the bed in a tangle! A minor redesign was made by including lightweight chains to clip between the outer and middle support to stop the spreading.
We sourced most of the appliances from a company in Oakville that supplied the camping trailer industry. A small two burner stove and a refrigerator that could operate on 12 volt electric from the truck, 110 volt electric if in a trailer park and on propane if no electric power was available. This little fridge proved so reliable that in 2009 it was still operating.
Storage and transporting propane was government regulated and propane was not allowed to be kept inside an enclosed space. The obvious location for a large 20 lb. tank was to put it on a rack outside the back door. This location would not work for us as we needed to get the spare tire out of the truck and the most suitable spot for it was on the back door.
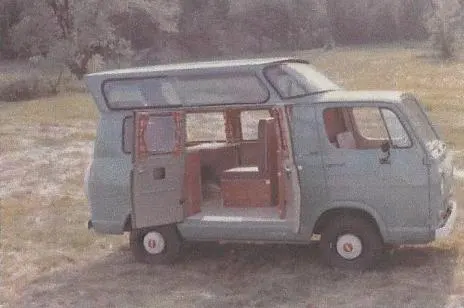
Looking over the entire truck, we found a clear space below the floor behind the driver’s seat. A hole was cut in the truck floor and Fred made up a steel basket that dropped the tank part way through the floor. The tank could be turned on or off, or changed from inside the truck and a weather-stripped wood box lid sealed the hole from the outside elements.
This arrangement was approved by the propane inspectors. The 110 volt wiring installation was also subject to an individual Hydro Electric Inspection and had to be officially labeled.
Other problems that presented themselves were the screening of the windows, securing seat cushion backs and securing the curtains in an open or closed position. A new product on the market – Velcro – was used to solve these issues.
After many long hours on nights and weekends we had a camper. We then arranged another trip to Oshawa to show off the new camper. The GM people wee very pleased with what we had. They took a few pictures and sent them out to GM dealers across Canada. It wasn’t long until we had an order for our first camper.
Where Can We Build Them?
Our small auto glass shop was not suitable to build campers in, and we had no idea how many we might actually be building. Next door to our shop was a two story building that had a vacant space on the main floor. On the second floor the landlords Jack and Marci Bevis had a coffee cup and wine glass decorating business. As neighbors, Jack and Marci had been watching the building of our first camper and they were quite willing to rent out the main floor on a month to month basis. The space had an overhead door at the back and a high ceiling so it soon became our production shop.
Two Bucks and Their Trucks
By 1966, we needed more production space. Our auto glass business was starting to suffer from neglect and we did not have the money needed to expand. In the end it was all sold to Standard Auto Glass, an auto glass company that was on track to expand into the largest auto glass company in Canada. Shortly after we sold Standard leased a very large warehouse that became their new head office, a windshield distribution centre, an auto glass installation shop and a new production space for the campers. Fred stayed with the campers and I split my time between auto glass and campers.

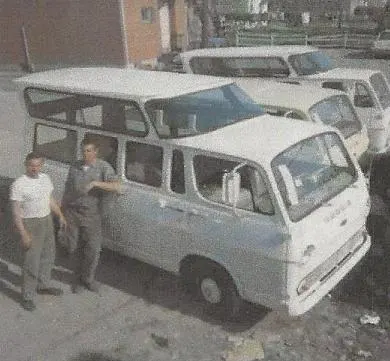
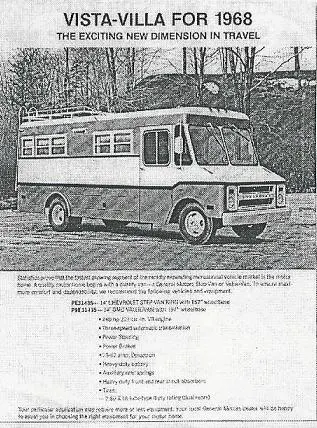
1967 brought a new model truck. The wheelbase was extended from 96 inches to 108 inches. This addition length made a great deal of difference to the space available for the camper furniture.
GM displayed the Vistavan at the Toronto Sportsman Show and this brought in a lot of new sales. We were invited to bring our camper to the Grand Opening of the new GMC Truck Centre in Montreal. Our camper was placed in the showroom with the largest truck that GM produced. It was quite a contrast and very effective.
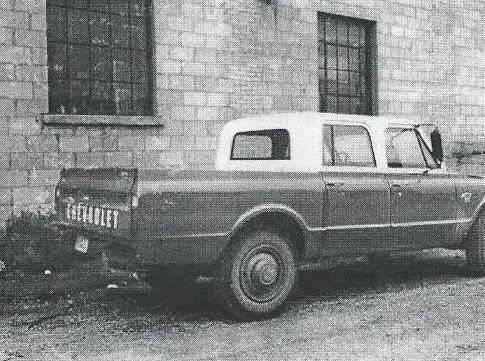
At the same time we were able to standardize all of the furniture and production increased smoothly. GM also contracted us to take a new pickup truck, cut it in half and create the first 4 door pickup truck.
The Ontario Health Ministry contracted us to convert a standard van into an ambulance. They were trying to get away from the expensive imports from the USA of Cadillac and Packard ambulance conversions of the day.
The van lent itself well to the ambulance layout but the ride left something to be desired. None the less, it was the beginning of truck based Ambulances.
There were no ambulances being built in Canada at the time and it was great fun researching the supply of equipment needed. Electronic sirens were new on the market and this one was well tested after it was installed! 1961 Plymouth Fury taillights were a standalone unit mounted on the rear side of the car and we used these for the roof flashing lights.
We had an order for a custom built camper based on the Chev Van. The sides were cut off and the vehicle widened. The back end was cut off and the vehicle lengthened. It was quite a load for that little chassis!
The last big project was the conversion of a curbside van into a luxury motor home. This was the only one built.
Ford approached us in 1968 to produce a camper truck for them. Fred, Norm Godfroy (our part time salesman who also worked for Standard Auto Glass) and I went to Oakville with a GM camper and met with their sales and engineering people.
Norm was a true salesman and could come up with a quick answer to anything. One of the Ford engineers asked a question about one of the overhead cabinet supports and Norm quickly replied “Oh! That can’t fall down because there is nothing holding it up”. There was a short pause and then the inspection continued. We built a few campers for Ford, but Ford sales were not substantial.
With all of this going on, profits for the company were lacking. Standard Auto Glass was expanding rapidly, and at the time a new auto glass branch location could be opened for less than $5000.00. Management decided the the money tied up in Vistavan could be put to better use expanding the more profitable auto glass business.
Vistavan was put on the market and sold to Tom Madill who moved the operation to Oakville, Ontario, Fred and I stayed with Standard. Tom made the new roofline from a one piece fiberglass mould. A couple of vehicles were made, but in less than a year Vistavan was out of business.
In all, we made about 85 campers. In retrospect, we were about 5 years ahead of our time, too young and too stupid to take the idea to the USA, where the market would have been at least 10 times that of Canada.
THANKS SCHWARTZ
Dedication
McWilliams Family:
Pat
David
Cathy
Laura
Block family:
Barb
Randy
Mark
With regret and sorrow for the price you had to pay while this history was happening.